Pcard Expense Reconciliation
As a Pcard holder, you are required to review, categorize and describe your charges. You will receive regular Wells Fargo email reminders indicating you have transactions that require coding. You can reconcile your transactions at any time during the month once they have posted to your account, and it is highly recommended you do so on a regular basis. The deadline for prior month’s expenses is always the 6th of the following month (i.e. September expenses must be reconciled by 5 pm on October 6th).
To review and reconcile your Pcard expenses
Login to Pcard Portal (Wells Fargo)
Reclassify FOAPALs for Expenses
Out of Pocket Expenses (Cash Expenses)
Out of Pocket Expenses (Cash Expenses): Mileage
Fix Incorrect Receipts / Upload Receipts Late
Complete (Submit) Your Expenses
View & Reset Completed Expenses
Returned Expenses from Your Approver
Missed Deadline – How to Reconcile Late
Getting Started
The new WellsOne Expense Manager is a transaction based platform, which deviates from the previous statement based platform. This means that you will reconcile and submit your expenses by the transaction, not by the statement as a whole. There is no final “Statement Reviewed” button to press in the new platform; instead, you officially finalize and submit your expenses to your Approver by clicking the Complete button on each expense.
It is recommended to start your reconciliation process by uploading your receipts first. Please review the Receipt Process for more information.
Login
Go to the Wells Fargo Commercial Electronic Office sign on page. Please note: this is a special sign on website for commercial/business cards. You will not be able to access your account via the regular Wells Fargo website for individual/personal accounts.
Enter in the Company ID: MACAL196, Your User ID, and Password. Click “Sign On”.
If you receive an error message, try one more time. If you are still unsuccessful, use the Forgot Password link to try and reset your password. If it won’t allow you to reset your password, contact the Pcard Administrator to request a password reset.

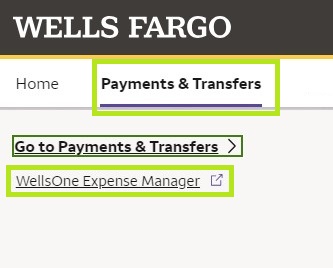
From this CEO home page, click on Payments & Transfers. In the sub menu, click on WellsOne Expense Manager to view your Pcard account.
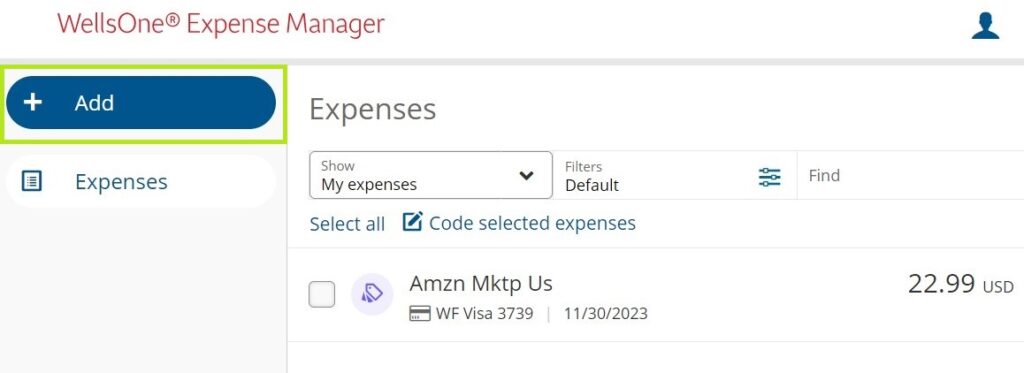
The Home Page will show you a quick run down of your monthly credit limit and your remaining available credit. You can view your Pcards and relevant details in the Accounts tab in the top menu. To reconcile your expenses, click the Expenses tab.

Reclassify FOAPALs for Expenses
Please Note: It is recommended to start your reconciliation process by uploading your receipts first. Please review the Receipt Process for more information.
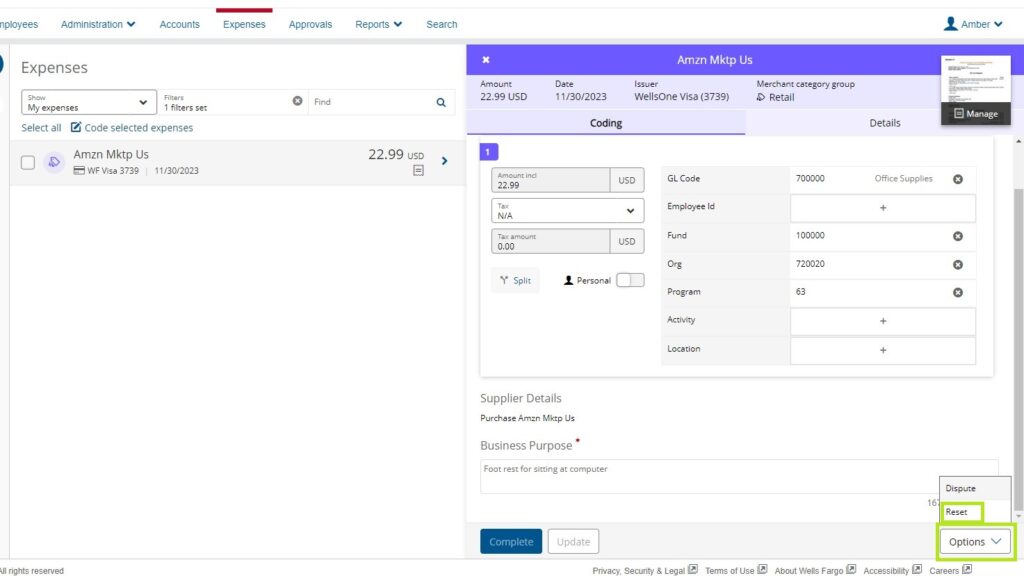
On the Expenses page, the default view shows your expenses that still require action. Click the right arrow to open the expense for editing.
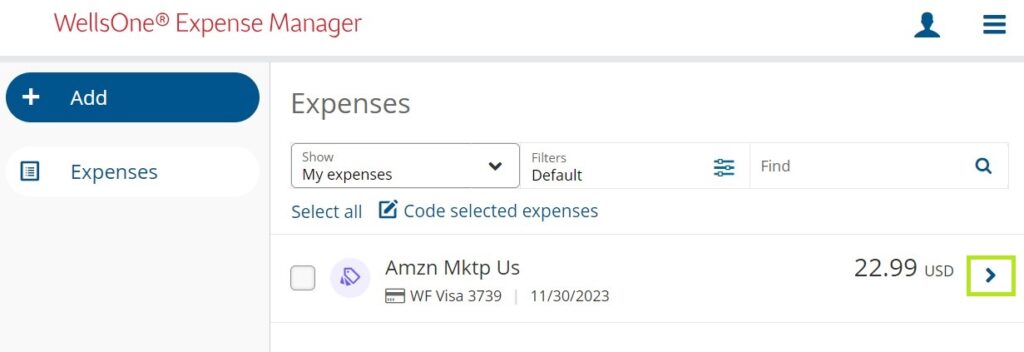
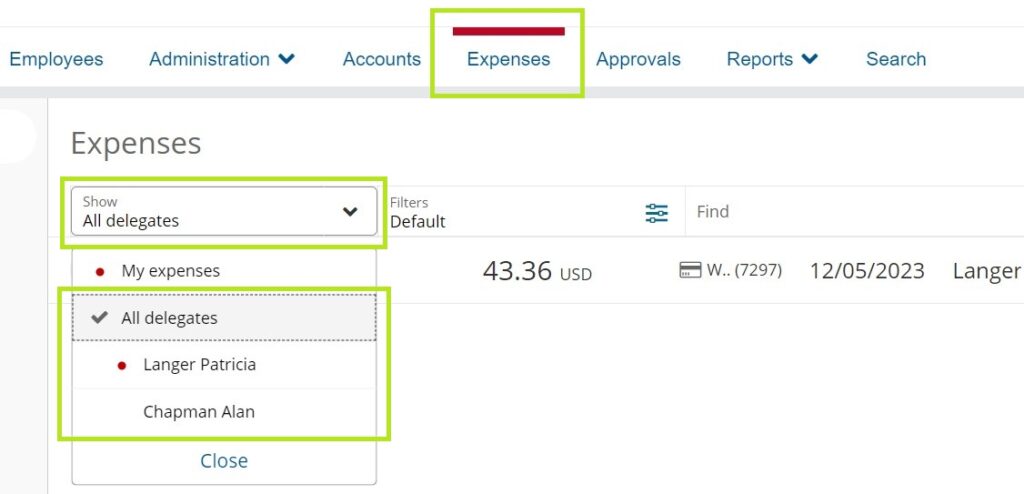
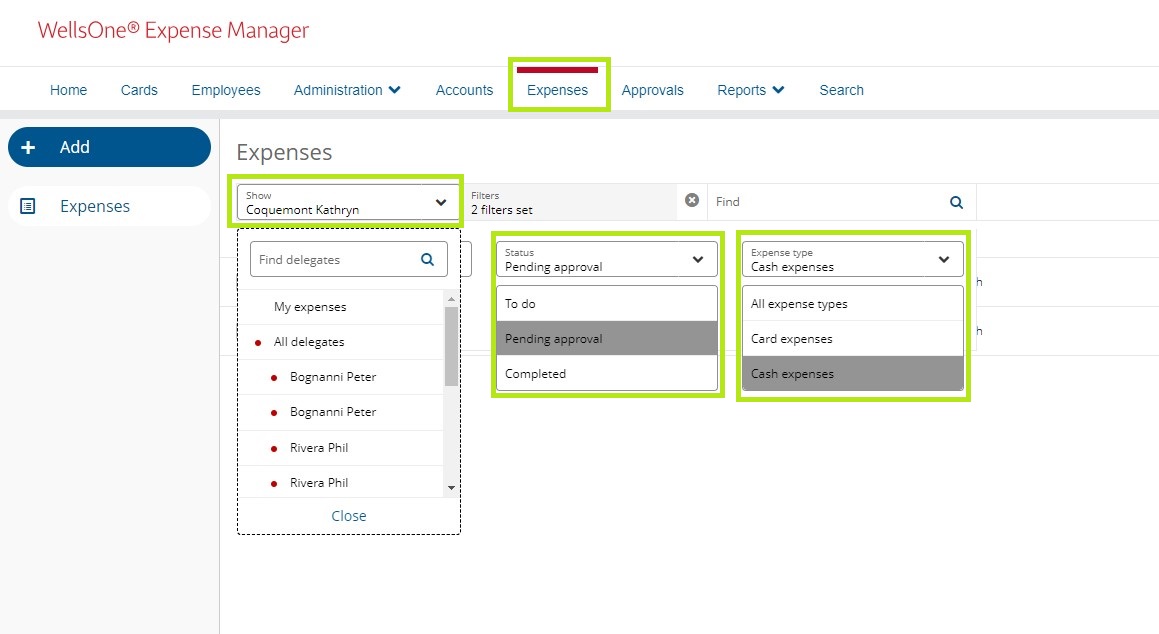
If you have multiple Pcards, or if you’re a Reconciler (Delegate) for another person’s card, you can see those expenses by using the filters. Click on Show My expenses to pull up a list of all the cards you have access to, and select which card you want to view.
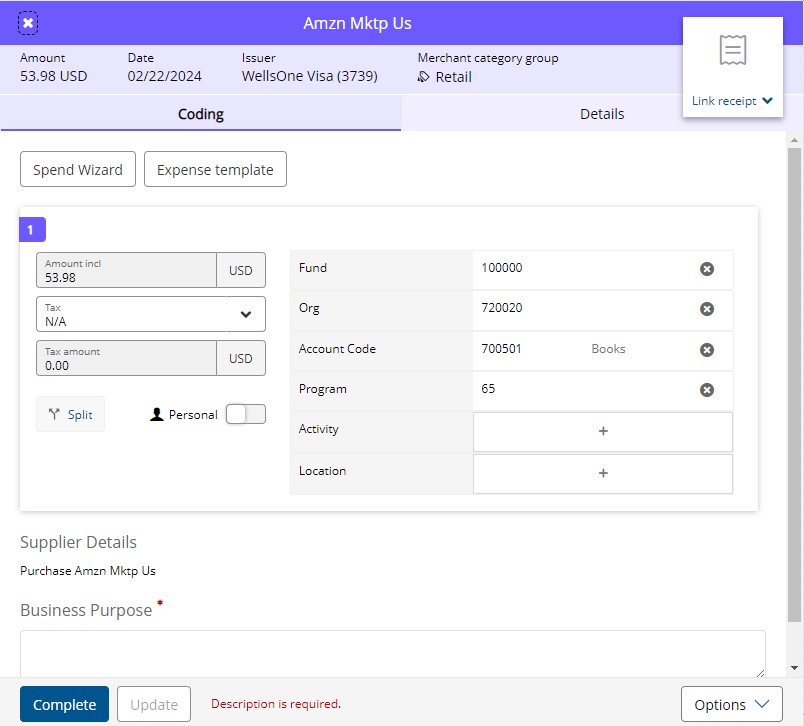
WARNING: ONLY click the COMPLETE button on your expense if you are 100% finished reconciling. This button finalizes the expense and forwards it onto your Approver. You can click the UPDATE button to Save your progress. If you accidentally click Complete before you’ve finished editing your expense, you will need to reset the expense in order to edit it again, which will cause you to lose any changes you made to the expense.
Each transaction requires a complete FOAPAL. Your Pcard is set to default to your designated FUND, ORGANIZATION, and PROGRAM codes. The ACCOUNT code is pre-populated based on the category of purchase, however, it is not always correct. If the Account code needs to be changed, click on the current code.
You can quickly choose from your favorite Account codes by clicking on the desired code, or click Search Account Code codes to open the full list of Account Codes to choose from.
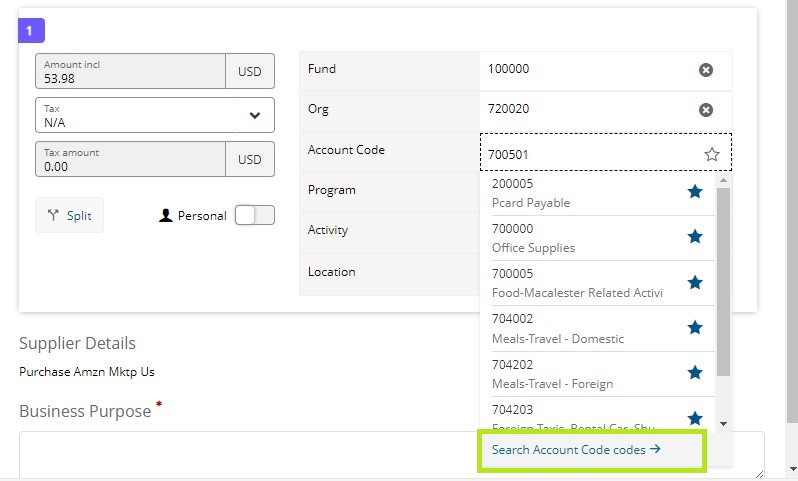
After pulling up the full list, you can search by code number or enter in a key word in the Description field and then click Search. You can also scroll down and page through all the options, but this method won’t show every available code, so you will need to use the Search function frequently. If you can’t find the code you need with the keyword you searched, try another keyword. You can also refer to the Account Code (gDoc) to see Account names, full descriptions, and examples as a guide to help you choose the most appropriate Account code. If you are still unsure which Account Code to use, please ask your supervisor. Click the most appropriate Account code on the expense once you’ve found it.
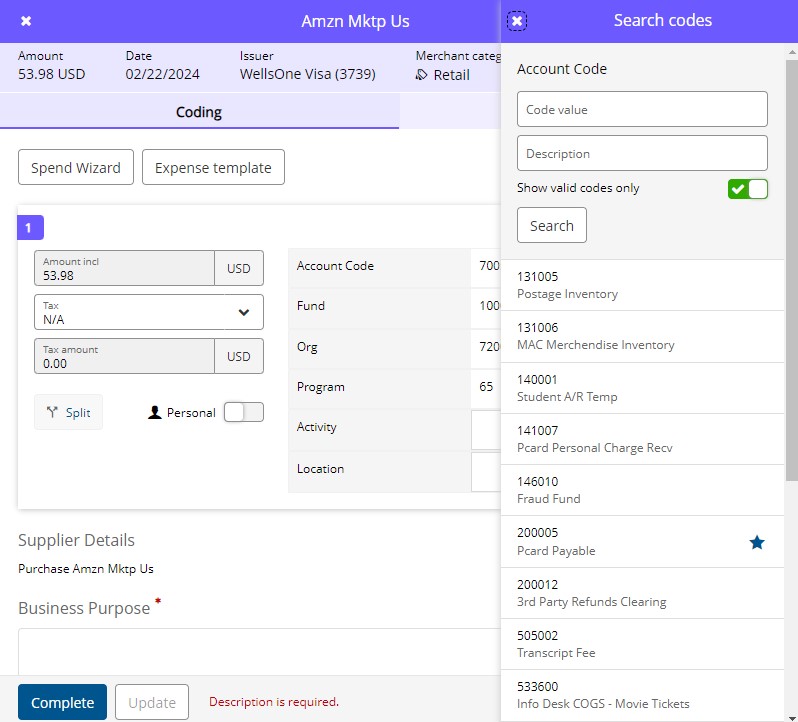
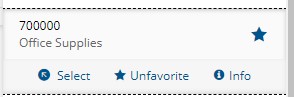
Once you click on the desired code, you’ll have the opportunity to click the Favorite button to add it to your Favorites list for future easy access. Click Select to add the Account Code to your expense.
You can update the FUND, ORG (Organization), PROGRAM, ACTIVITY, and LOCATION codes by clicking in each box and retyping the appropriate code. ACTIVITY and LOCATION codes are not required but can be helpful. Check with your supervisor and/or Pcard approver to determine if your department uses Activity or Location codes. If you use Activity or Location codes, they must be codes that are already established with Macalester’s official accounting structure.
Do NOT enter Activity or Location codes if your department doesn’t use them (they should remain blank, do not enter 0), and if they are not officially established codes. NEVER enter alphabetical characters into a FOAPAL field. This will cause an error when processing our monthly data upload, which will require additional manual work to correct. If you want to note who or what a purchase was for as an additional identifier, you can add that information to the Business Purpose (Description).
Be careful not to mix up the various FOAPAL fields, and double check that you’re entering the correct type of code into the correct field (the Activity field is commonly misused as the Account field for instance).
Click Update when finished to Save.
Adding Descriptions
Every expense requires a Description, which is referred to as the Business Purpose in Wells Fargo. (See previous image above).
The description should provide a clear business purpose for the transaction. Descriptions do not have to be long or full sentences. For purchases tied to a specific date such as flights, event tickets, conference registrations, etc., you must enter the date(s) the activity will take place on. This is important because purchases of these types that don’t take place until the following fiscal year (FY) must be put into that year’s budget. See examples below.
Good Examples:
Lunch with J. Smith about reunion
Donor meeting with J. Smith class of ‘72
Breakfast bagels for staff meeting
J. Smith Flight on 8/24/23 to AAA conference
J. Smith AAA conference registration (8/15/23-8/18/23)
Standard office supplies – pens, post it notes, paper, etc.
Test tubes for J. Smith Research Grant
Gift Card for student worker, J. Smith – end of year thank you
Personal Charge – used wrong card
Splitting Transactions
Occasionally, you may need to Split a transaction into multiple FOAPALs. This may happen if you’re splitting an expense with another department, if you need to mark only part of a purchase as a Personal expense, or if you purchase multiple types of products in one transaction (I.E. Books, Clothing, Office Supplies, etc…). To Split a transaction, click the Split button below the expense amount. It will automatically be split into two, but you can add extra splits if needed by clicking +Add line. If you don’t want the transaction split evenly, you can un-toggle the Split evenly button and add in the desired amounts. Click the Split button at the bottom of the Split pane when finished.
For each part of the split, select the appropriate Account code as described above in the Reclassify FOAPALs section. Change the Fund, Org, Program, Activity, and Location codes if necessary.
If part of your purchase was a Personal expense, toggle the Personal button for the part that you are reimbursing Macalester for. When finished, click Update to Save.
Creating Expense Templates
If you have recurring purchases, you can create Expense Templates to memorize specific FOAPALs and descriptions so that you can quickly and easily reconcile expenses.
Accidental Personal Purchases with your Pcard
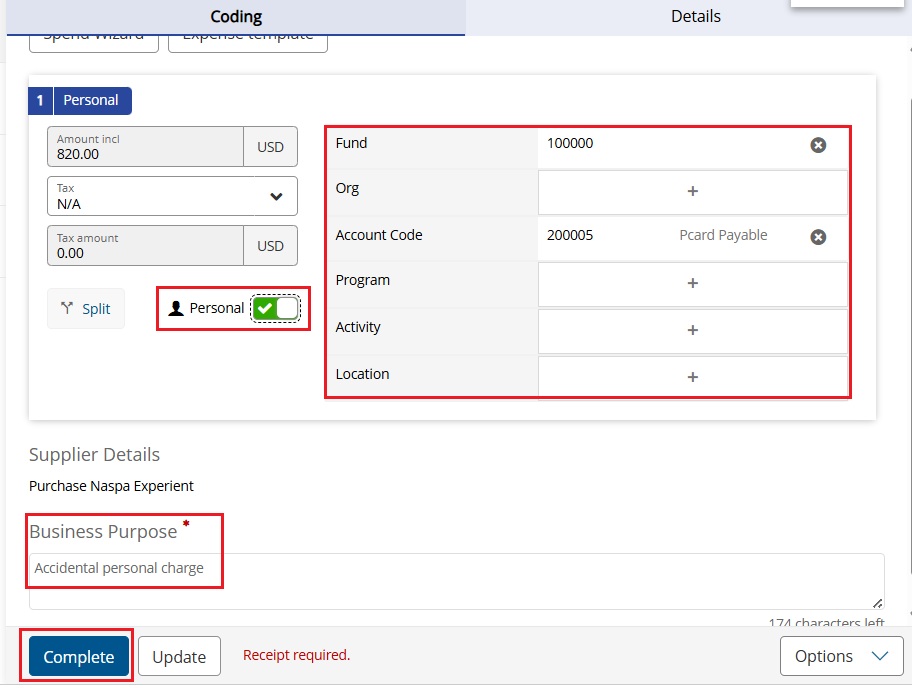
If you accidentally make a non-work related personal purchase with your Pcard, use the following instructions to reimburse Macalester.
- Connect your personal bank account to your Wells Fargo Pcard account
- Open the expense on the Expenses page
- Enter in the Business Purpose (description) field that it is a “personal charge”
- Toggle the Personal button
- Change the Fund to 100000 if it is different
- Change the Account Code to 200005
- The Org, Program, Activity, and Location fields should be empty. Delete any of these codes if they’re filled in
- If the charge is $50 or more a receipt must be uploaded. Use this PDF as the receipt if needed.
- Click Complete
Wells Fargo will automatically withdraw the funds from your personal bank account and reimburse Macalester around the 11th of the month after the statement period is locked. You will receive an email from Wells Fargo alerting you. No further action is required.
If you are unable to get your bank account connected before the 10th, you will need to write a check to Macalester and send it to the Pcard Administrator at 77 Mac, 302. If you don’t have checks, you can send exact cash. If you don’t have exact cash, you can get change from the Student Accounts Office on the first floor of 77 Mac.
If you didn’t mark a personal purchase as personal in Wells Fargo and it is past the reconciliation deadline, inform the Pcard Administrator promptly via email.
Out of Pocket Expenses (Cash Expenses)
If you have Out of Pocket (OOP) expenses (referred to as Cash Expenses in Wells Fargo) for which you need to be reimbursed by Macalester, you can enter these expenses in your Pcard account for direct reimbursement to your personal bank account. To utilize this option, you must link your personal bank account to your Wells Fargo Pcard account. Submitting your College related expenses via your Wells Fargo Pcard account is an easy reimbursement method and is highly preferred. If you don’t want to connect your personal bank account, you must submit a Check Request or Petty Cash form to Business Services.
NOTE: See the Mileage section for specific mileage reimbursement instructions
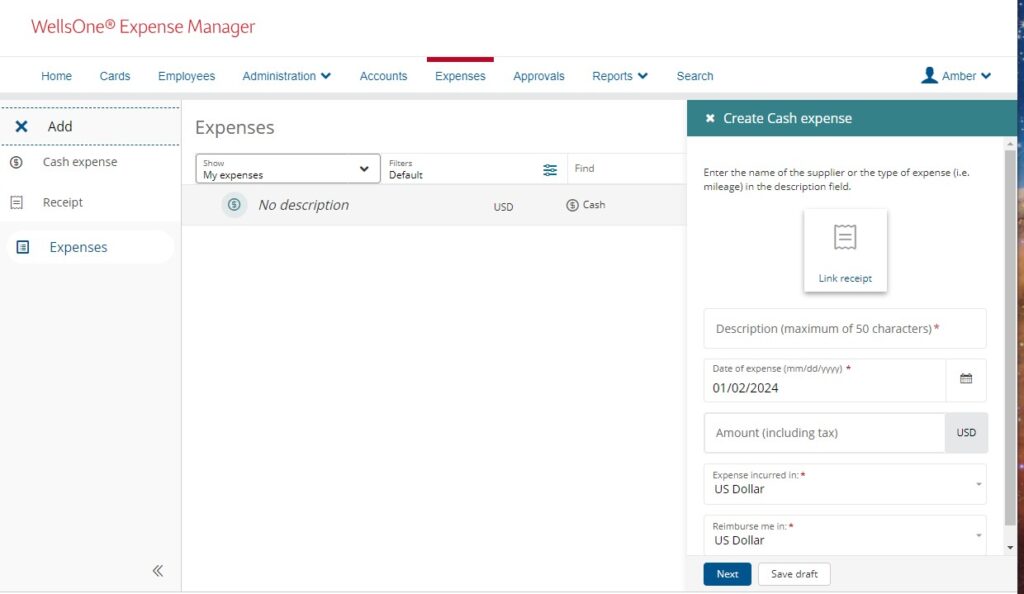
To Add OOP Expenses, navigate to the Expenses page in your Wells Fargo Pcard account. Once there, click on the big blue Add button. If you are Delegate for another cardholder and need to add an OOP Expense for them, you must first click the Show My Expenses filter, and then select the person’s account.
The Create Cash Expense pane will open. Don’t attach the receipt on this initial Create Cash Expense pane; we’ll do that in a later step. Referencing the receipt you have for your expense, enter the store/merchant name in the Description field (there is a different Description/Business Purpose field later in this process for the purchase description), the Date of Expense, and the Amount you need to be reimbursed for (excluding sales tax that Macalester would be exempt from). Once finished, click Next.
You must go through this Spend Wizard process for OOP Expenses on the Coding tab. Do not click the Details tab. The Spend Wizard cannot be skipped like with regular Pcard Expenses. Select the appropriate expense category (scroll down to see all choices). If you click a category and can’t find the type of expense you’re looking for, click Back, and try another category.
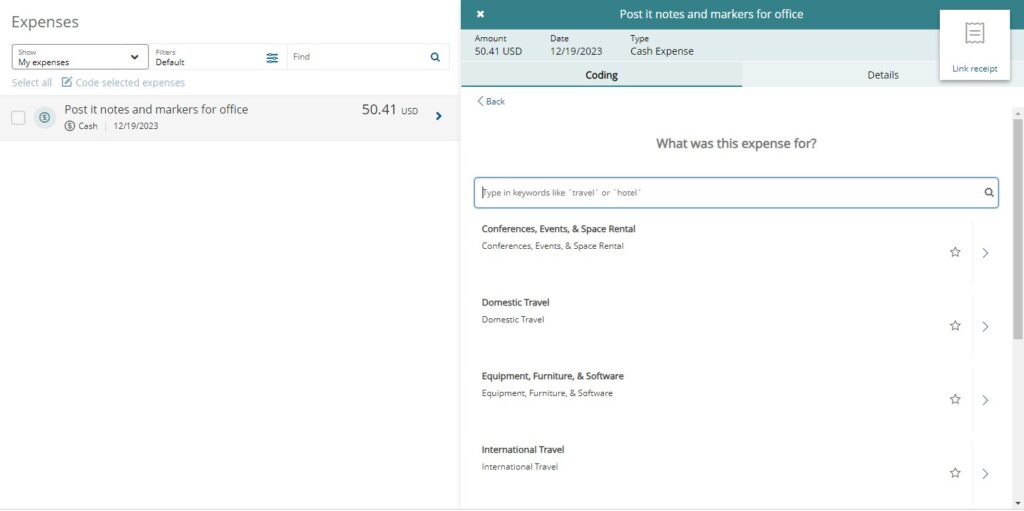
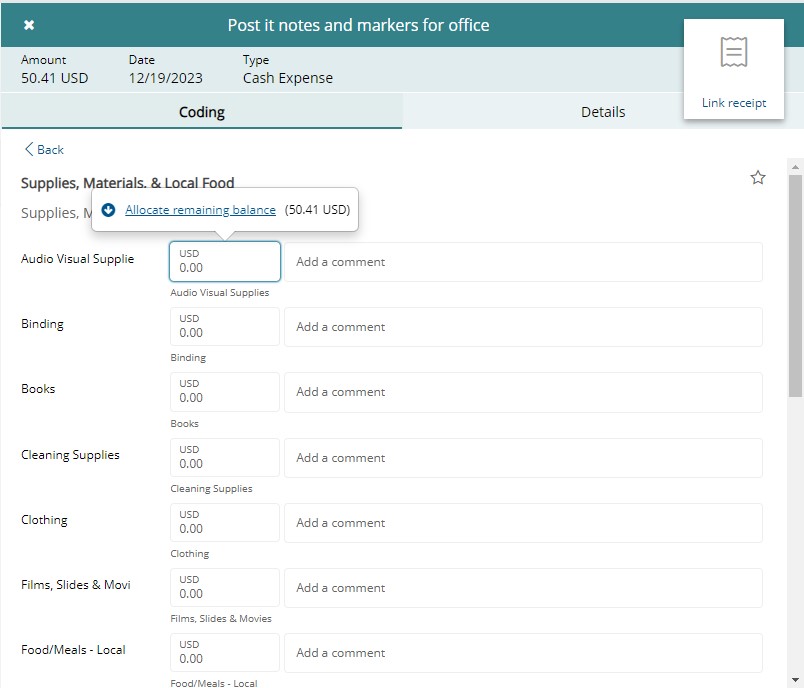
You will see multiple expense types to choose from. Please note that each OOP expense needs to be entered SEPARATELY. You should only use multiple fields here (I.E, books, clothing, cleaning supplies) if they were part of the same receipt. You can click Allocate Remaining Balance on whichever item is applicable to easily populate the amount, or you can type in the dollar amount. Leave the comment field blank. When finished, scroll down and click Next.
The base default FOAPAL will be automatically populated, but you can adjust it if needed following the same process as you would normal Pcard expenses. This is also where you can now add your purchase description in the Business Purpose field. You can hit Update to save your progress. You must hit Complete to fully submit the expense to your approver.

If you need to View, Edit, or Delete OOP (cash) expenses, you can do so on the Expenses page. If you didn’t Complete the expense yet, it will show up on the main Expenses page without having to change any of the filters (unless it’s a Delegated account of yours). If you already Completed the cash expense, you will need to filter the Status to either Pending Approval or Completed. If the expense has a Completed status, that means the expense was already approved, and you will need to ask your approver to reset the expense. If it’s still Pending Approval, it will show up once you filter for that status. The Expense Type filter should automatically be on All Expense Types, but you can filter for Cash Expenses if needed. If you need to Edit or Delete OOP expenses for one of your additional Pcards or for someone else you reconcile for, click on Show My Expenses and choose the account you want to view.
Once you’ve found the expense, click on it. The expense will open, and on the bottom right corner click the Options menu. Click on Edit if you want to keep and edit the expense, or click Delete to fully delete the expense.

Out of Pocket Expenses (Cash Expenses): Mileage
If you have Out of Pocket (OOP) expenses (referred to as Cash Expenses in Wells Fargo) for which you need to be reimbursed by Macalester, you can enter these expenses in your Pcard account for direct reimbursement to your personal bank account. To utilize this option, you must link your personal bank account to your Wells Fargo Pcard account. Submitting your College related expenses via your Wells Fargo Pcard account is an easy reimbursement method and is highly preferred. If you don’t want to connect your personal bank account, you must submit a Check Request or Petty Cash form to Business Services.
To Add OOP Expenses, navigate to the Expenses page in your Wells Fargo Pcard account. Once there, click on the big blue Add button. If you are Delegate for another cardholder and need to add an OOP Expense for them, you must first click the Show My Expenses filter, and then select the person’s account before clicking the Add button.
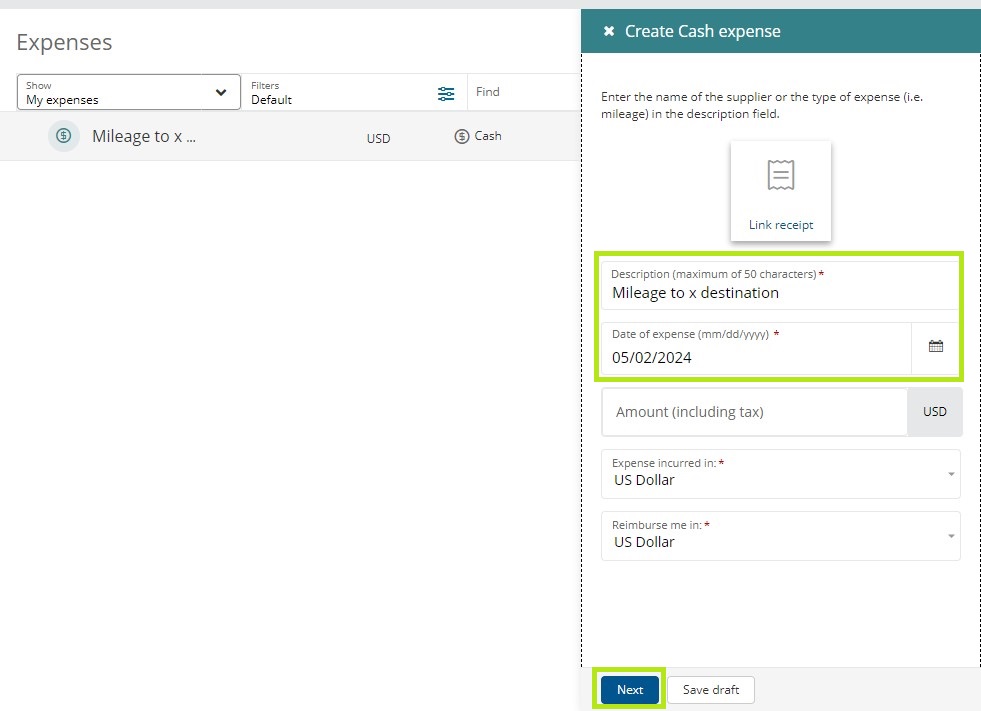
The Create Cash Expense pane will open. Select the date of the trip and add a trip description. Do not enter a dollar amount on this first screen for mileage reimbursements. Once finished, click Next.
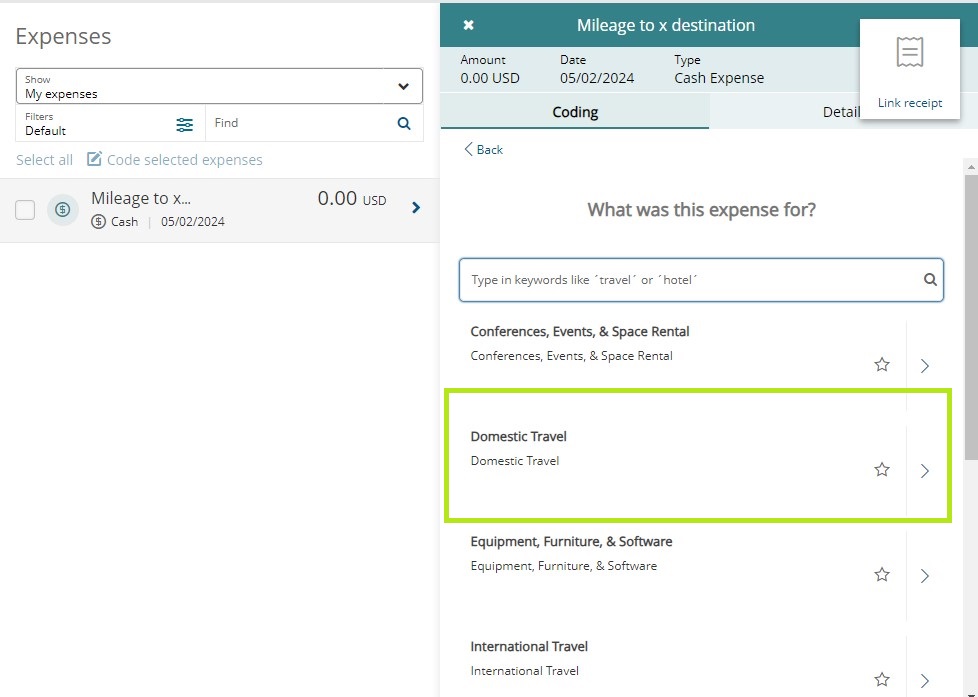
You must go through this Spend Wizard process for OOP Expenses on the Coding tab. Do not click the Details tab. The Spend Wizard cannot be skipped like with regular Pcard Expenses. For mileage, select Domestic Travel.
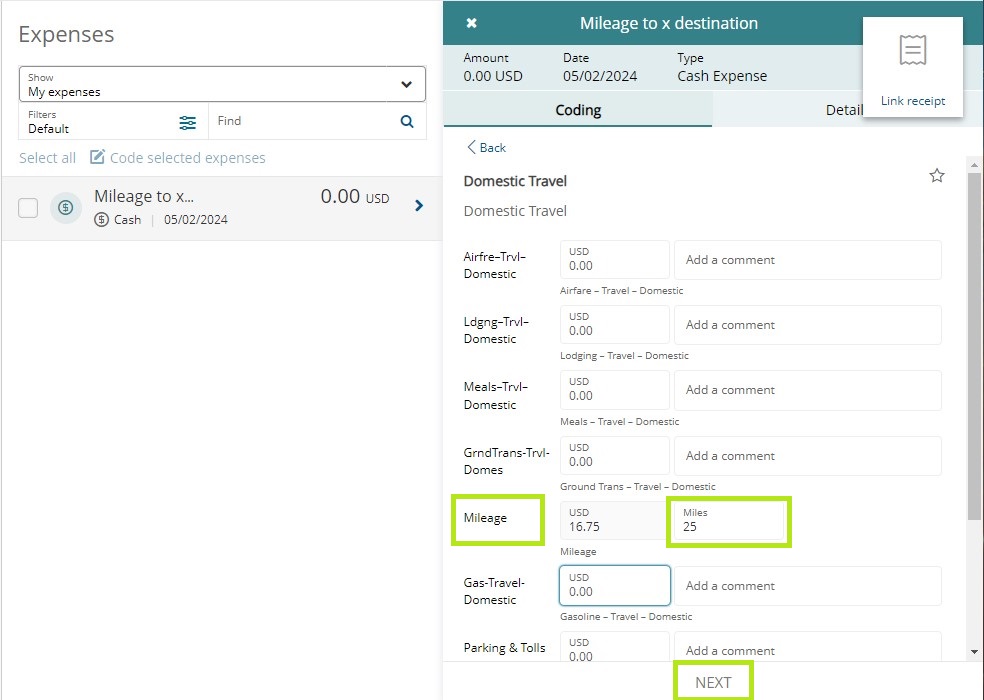
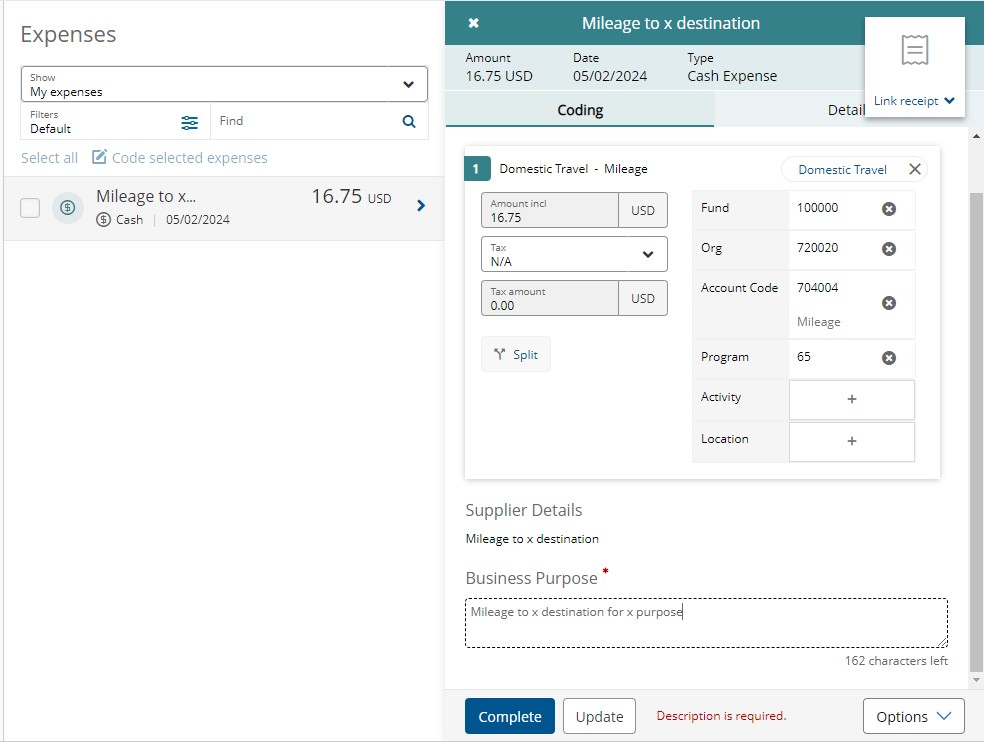
Enter the number of miles driven in the right side Miles field. The dollar amount will automatically populate based on the current IRS mileage rate. Leave the comment field blank. When finished, scroll down and click Next.
The base default FOAPAL will be automatically populated, but you can adjust it if needed following the same process as you would normal Pcard expenses. This is also where you can now add your purchase description in the Business Purpose field. Your ‘receipt’ can be a map or driving directions for the distance calculated. Click Update to save your progress. Only click Complete when you are done editing; this will fully submit the expense to your approver.
If you need to Edit or Delete OOP (cash) expenses, you can do so on the Expenses page. If you didn’t Complete the expense yet, it will show up on the main Expenses page without having to change any of the filters (unless it’s a Delegated account of yours). If you already Completed the cash expense, you will need to filter the Status to either Pending Approval or Completed. If the expense has a Completed status, that means the expense was already approved, and you will need to ask your approver to reset the expense. If it’s still Pending Approval, it will show up once you filter for that status. The Expense Type filter should automatically be on All Expense Types, but you can filter for Cash Expenses if needed. If you need to Edit or Delete OOP expenses for one of your additional Pcards or for someone else you reconcile for, click on Show My Expenses and choose the account you want to view.
Once you’ve found the expense, click on it. The expense will open, and on the bottom right corner click the Options menu. Click on Edit if you want to keep and edit the expense, or click Delete to fully delete the expense.
Upload & Link Your Receipts
Receipts are required for ALL transactions regardless of dollar amount. They must be uploaded to your Wells Fargo Pcard account and linked to the corresponding transaction.
It is easiest to upload receipts to your Image Library before reconciling your expenses. The receipt uploading feature has a built in AI that attempts to match receipts to your transactions, which will save you time in the end. The system is almost always accurate if it successfully auto-links a receipt, but you still need to verify the correct receipt was linked.
There are a variety of methods for uploading receipts to make it as easy as possible. First, you need to save your receipts as image or PDF files. For paper receipts, you can snap a photo with your cell phone or scan them with one of Macalester’s printers. Save the files to your phone, your Google Drive, or your computer depending on the upload method you choose to use.
Upload Methods- Mobile Phone App
- Download the WellsOne Expense Manager app for Android or Apple.
- When you open the app for the first time, you’ll need to connect your account, which you can do easily by logging into your account on a computer. Once you’re in the WellsOne Expense Manager on your computer, click your name in the upper right corner to open your personal menu, and then click Mobile App. Once the Mobile App screen pops up, click on Get QR Code. Scan the QR code with your phone through the WellsOne mobile app, and your account will be linked.

- Once you have your account linked and open on your mobile app, click the menu (3 line “hamburger”) button in the top left corner.
- Click Receipts.
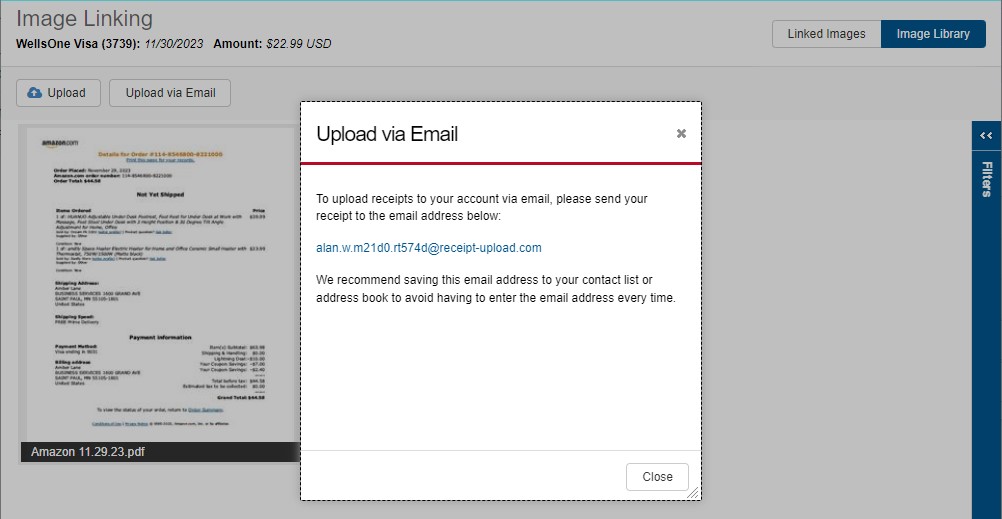
- You have a unique email address tied to your Wells Fargo account. You can send image/PDF files in an email to your unique email address, and they will be uploaded to your Image Library. You can use this method on your phone or on a desktop computer.
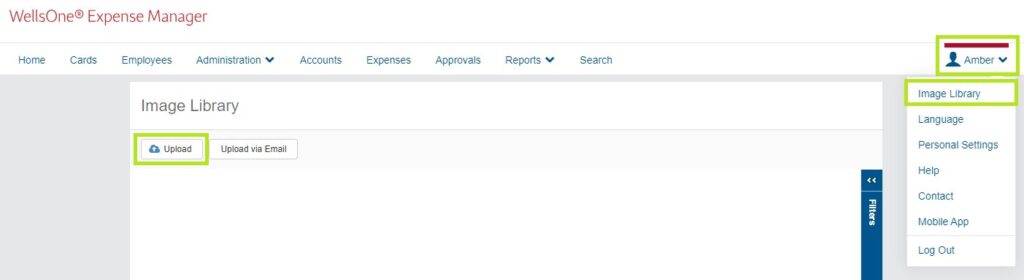
- To find your unique email address, login to your WellsOne Expense Manager on a computer. Once logged in, click your name in the upper right corner to pull up your personal menu. Click Image Library, then click Upload via Email. Your unique email address will be displayed. Save this address to your email contacts for easy access in the future (not the one in the screenshot below, that is just an example. You have your own personalize address).
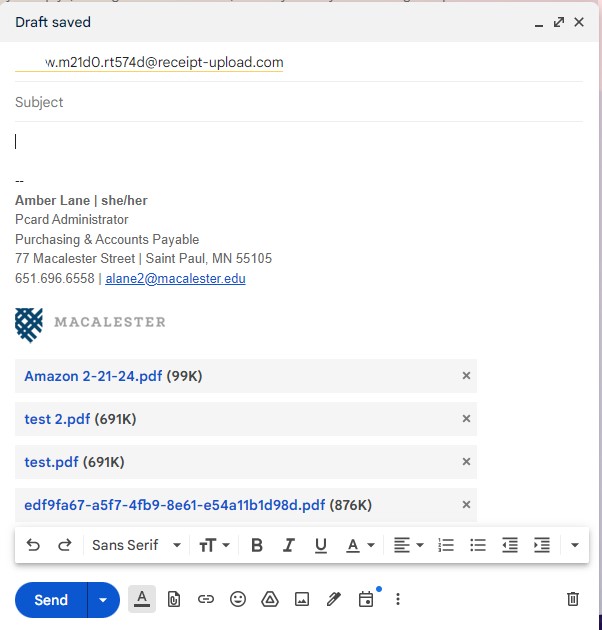
- Compose a new email to your unique email address (not the one in the screenshot below, that is just an example). Attach your receipt files, and click send. You do not need to include an email subject or body text.
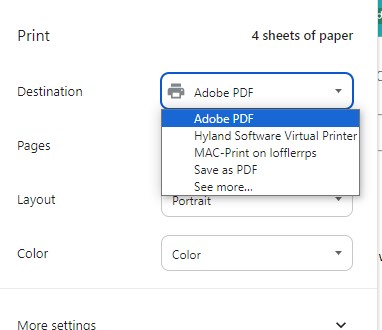
- PLEASE NOTE: You CANNOT simply forward a plain email you received from a merchant. Receipts need to be emailed as attached files. You can turn a plain email into a PDF by clicking the 3 dots at the top right of the email and clicking Print.
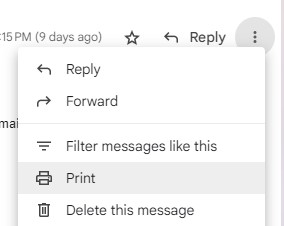
- Once the print screen opens, select Save as PDF or Adobe PDF as your destination printer, and then click Print.
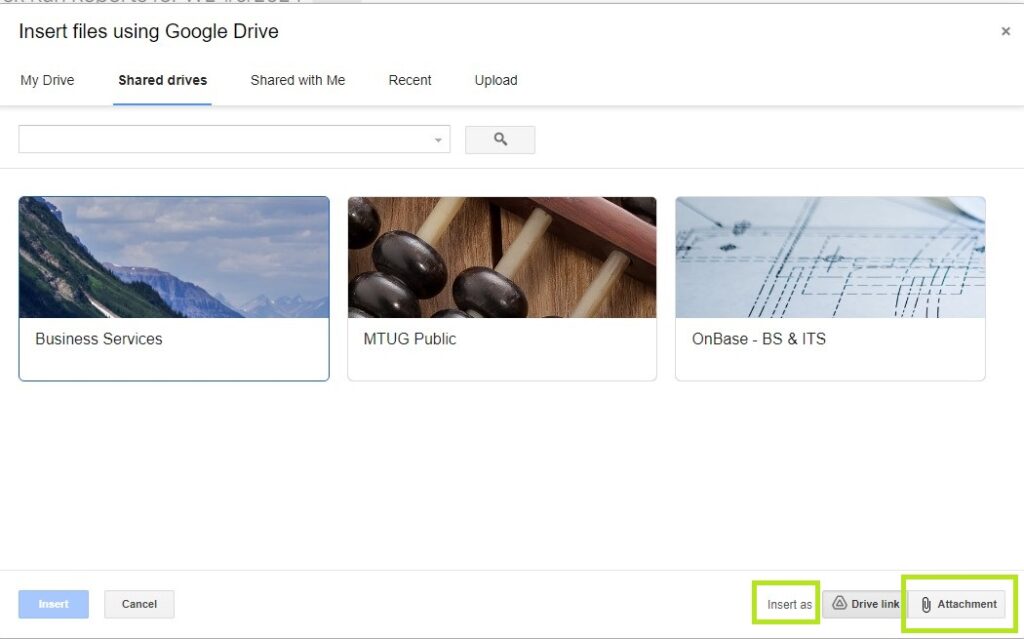
- If you store your files in Google Drive, you can attach Google Drive files to the email to send, but you must choose to insert the files as ATTACHMENTS, not Drive Links.
- You will be prompted to select a location on your computer/device to save the file. Once the file is saved, you must attach that file to your receipt upload email.
Direct Desktop Upload
- You can upload files to your Image Library from your desktop computer files. Login to your WellsOne Expense Manager. Once logged in, click your name in the upper right corner to pull up your personal menu. Click Image Library, then click Upload. Choose the files you want to upload, and then click Open.
Link Your Receipts
Once you’ve uploaded your receipts, give the system time to try and auto-link the receipts to your transactions. This may take longer if you’re uploading a lot of receipts at once. You can check the status of auto-linking by opening your Image Library. Please note: no receipts should stay in the Image Library. It is a temporary folder that holds your uploaded receipts until you link them to the corresponding transactions. If there are still receipts in your Image Library, that means you still need to link them to an expense, or you uploaded the same receipt twice. If there is a duplicate receipt in your Image Library, you can click on it and then Delete it.
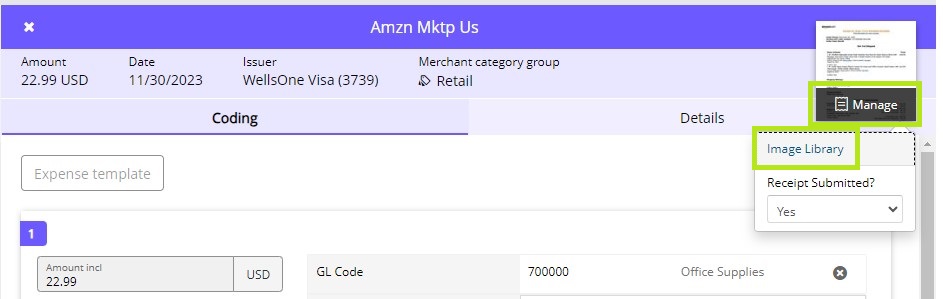
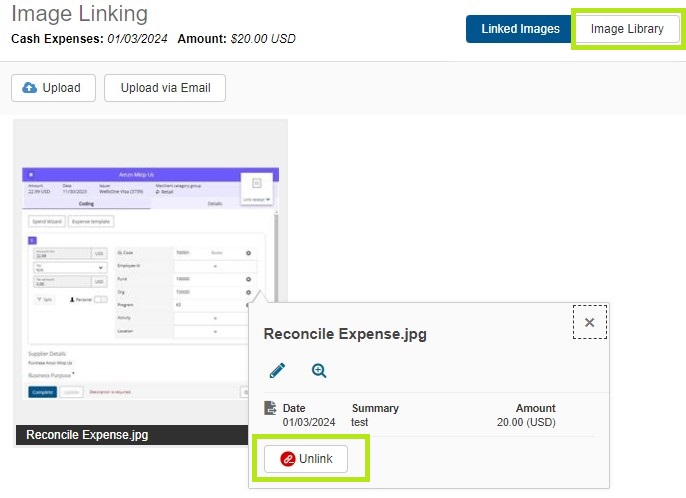
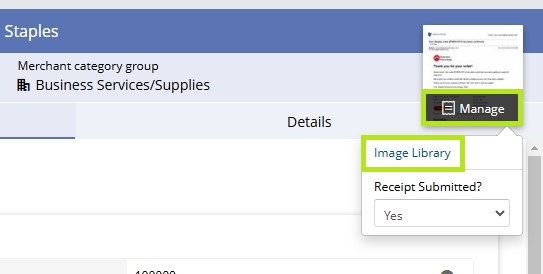
To link your receipts and verify auto-linked receipts, go to your Expenses page. Click the right arrow on the expense you want to open. Once it opens, click on the receipt icon in the upper right corner of the expense. If a receipt was auto-linked, it will look like the image below; click Manage. If no receipt was linked, it will say Link Receipt. Clicking this will open up a small sub menu, then click on Image Library.
If a receipt was auto-linked, you’ll get the following screen showing what was linked. Click the image, and then click the magnifying glass to see a larger version so you can verify the correct receipt was linked.
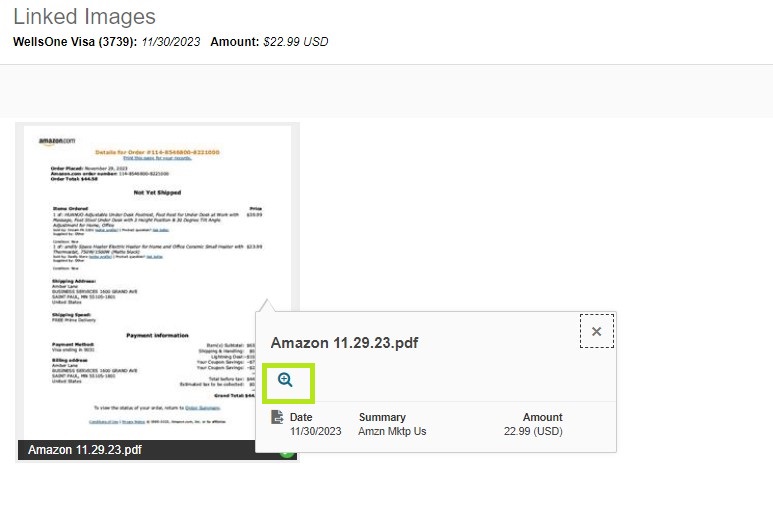
It should be correct, but on the off chance it’s not, you can click Unlink, and then click Image Library in the upper right corner. Choose the correct receipt from your Image Library and then click Link.
If no receipt was initially auto-linked, you’ll get the following page. Find the correct receipt for the transaction and click on it, then click Link. It will state once the image has been successfully linked.

Receipt Guidelines
- Receipts are required for ALL transactions regardless of dollar amount.
- If a receipt is missing, add a note to the transaction description on your statement in Wells Fargo stating that you cannot obtain a receipt and the reason why.
- If the transaction was $50 or more, you will also have to fill out a Missing Receipt Declaration. (If the purchase was made with Federal Grant Funds, you will need to submit a Missing Receipt Declaration for each missing receipt regardless of dollar amount). You will receive a final PDF from PandaDoc via email once your Approver has signed the declaration. This becomes your receipt, and should be uploaded as the receipt to the transaction in Wells Fargo.
- Please note: this $50 threshold ONLY applies when a Missing Receipt Declaration is required to be submitted. It does not mean that you only need to submit receipts for transactions that are $50 or more. We are externally audited for purchases of all amounts, so we require receipts for every purchase as much as possible. We understand that a receipt may be lost, or that you may not be given one, and that is ok. We internally audit all statements and receipts each month, so if a receipt is missing and you have not addressed that in your transaction description and/or have not submitted a Missing Receipt Declaration when one is required, we will ask you for it.
- All receipts should be itemized and show what was purchased. Meal receipts must also include the written tip amount; the amount on the receipt must match what is on the statement.
- Mileage receipts can be made using a screenshot of Google maps showing the distance between your destinations.
- Receipts for subscription services such as Spotify can typically be found in the billing section of your account.
Fix Incorrect Receipts / Upload Receipts Late
Receipts can be edited or uploaded for the first time past the deadline (it is expected that receipts be submitted on time; missing the deadline should be a rare occasion. Receipts are the only thing that can be edited past the deadline).
First, navigate to the Expenses page. If you’re a Delegate for someone else and need to edit their expenses, click on Show My Expenses and choose the account you want to view.
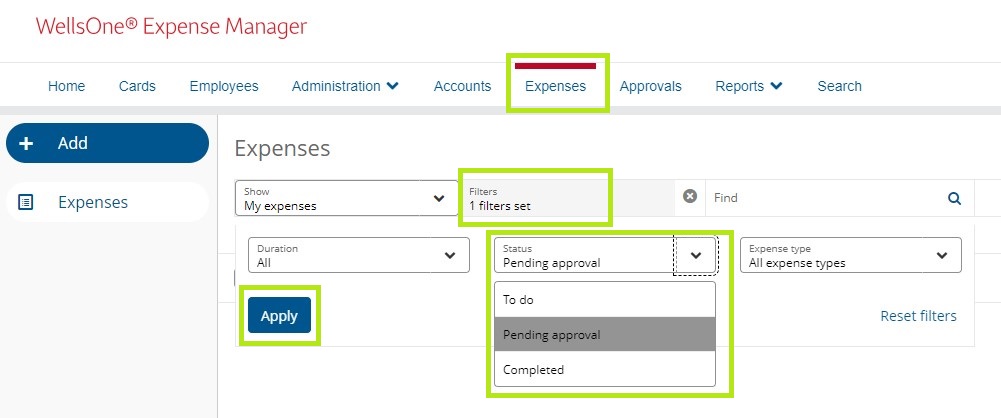
Next, click on the Filters field. Click Pending Approval to see expenses you’ve submitted to your approver that haven’t been approved yet, then click Apply. If the expense(s) you’re looking for isn’t in the Pending Approval list, then click the filter again and select Completed to see expenses you’ve submitted to your approver that have been approved. Click Apply.
Once you find the expense, click on it to open it. If you are uploading a receipt for the first time, proceed with doing so as you normally would. If you already uploaded a receipt and realized it is incorrect, click Manage on the receipt icon in the upper right corner, then click Image Library.
Once the Image Library opens, click the linked receipt, and then click Unlink. Once it is unlinked, you can proceed with uploading and linking the correct receipt as you normally would.
Complete (Submit) Your Expenses
Expenses need to be Completed individually, which you can do when you’re reconciling them initially as long as you’ve already uploaded your receipts to your image library. Each expense has an Update and a Complete button; Update will Save your work, and Complete will finalize the expense and submit it to your approver.
View & Reset Completed Expenses
Once you Complete transactions on your main Expenses page, you will notice that they disappear. You are able to view Completed expenses by changing the filters on the Expenses page. Additionally, if you Complete an expense and then realize you’ve made an error on the FOAPAL or expense description, you can reset it so that you can edit it again as long as your approver hasn’t approved the expense yet, and as long as the period deadline has not passed. If the period is still open and your approver has already approved the expense, you will need to ask them to reset the expense, which will send it back to you for editing. If all you need to do is fix a receipt, the expense does not need to be reset; please follow these receipt instructions instead.
To find your Completed expenses, navigate to the Expenses page. If you’re a Delegate for someone else and need to view/reset their expenses, click on Show My Expenses and choose the account you want to view.
Next, click on the Filters field. Click Pending Approval to see expenses you’ve submitted to your approver that haven’t been approved yet, then click Apply. If the expense(s) you’re looking for isn’t in the Pending Approval list, then click the filter again and select Completed to see expenses you’ve submitted to your approver that have been approved. Click Apply.
If the expense shows up under the Completed filter and you need to edit the FOAPAL or expense description, you need to ask your approver to reset the expense for you.
If all you need to do is fix the receipt, the expense does not need to be reset; please follow these receipt instructions instead.
If the expense shows up under the Pending Approval filter, you can reset the expense yourself with the following instructions. Click on the expense you want to reset. Then, copy the Business Purpose (expense description), as it will disappear when you reset the expense. You can paste it into a notepad document for safe keeping if you’d like. The FOAPAL will also be reset to your default FOAPAL, so you’ll need to change the FOAPAL again if you aren’t using your default. Click on the Options button in the lower right corner of the expense screen, and then click Reset.
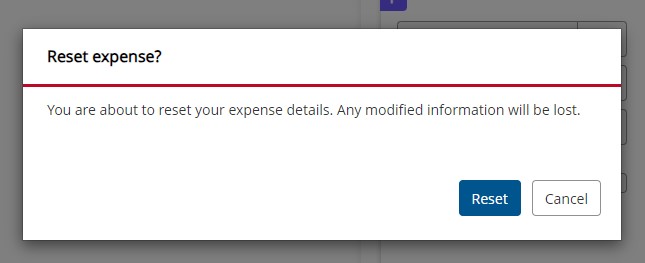
The following prompt will pop up; click Reset. As mentioned, the description and any changes to your default FOAPAL will be lost. It will retain the linked receipt, though.
Once you’ve clicked reset, you will need to change the status filter on your Expenses page again from “Pending Approval” to “To Do”. Then you can open the expense, paste the Business Purpose (description) you copied earlier, and make any other necessary changes. Once finished, click Complete again to submit the expense to the approver.
Returned Expenses from Your Approver
Once you Complete an expense, it is sent to your approver. Your approver has the ability to return an expense to you if they see an error or have a question about it. If this happens, you’ll get an email notification from Wells Fargo (unless you opt out of those notifications; if you do, it is still your responsibility to monitor your account for these issues).
The expense will show back up on your main Expenses page. Click on it to open it, and scroll to the bottom. Expand the Approval Rules section by clicking on the header to view your Approver’s note. Fix the issue, and then add a reply to your approver to let them know the request is completed. Press the Complete button on the expense to re-submit it to your Approver.
View Statements
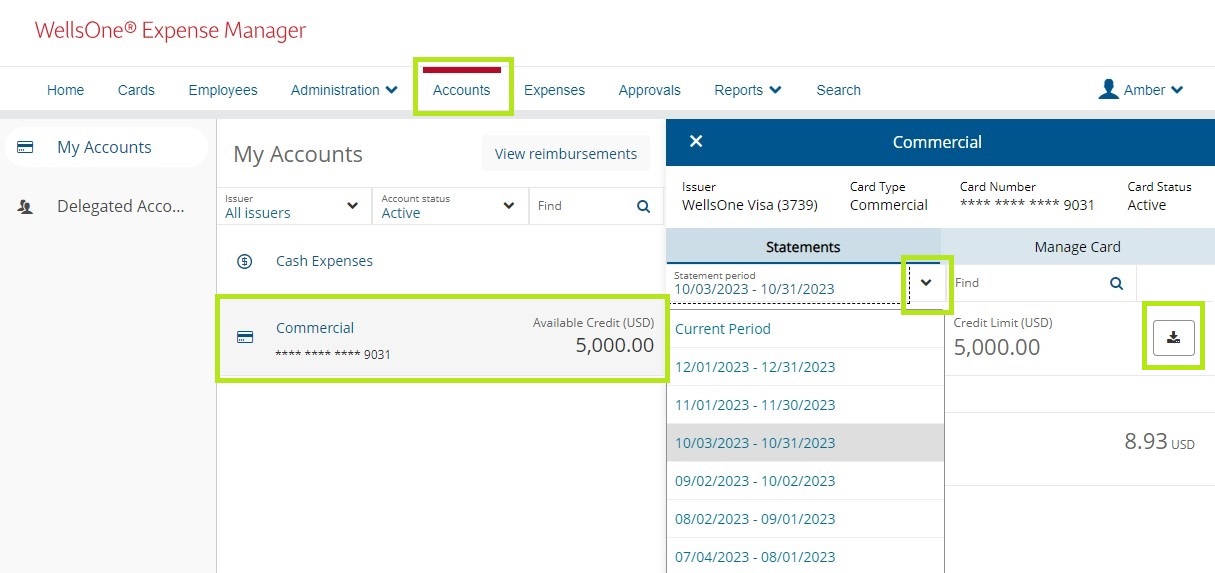
To view current and past statements, navigate to your Accounts page. Click on the account you want to view. If you need to view additional cards of yours or cards you reconcile for other people, click on Delegated Accounts on the left. Once you’ve opened the desired account, click on the down arrow below Statements. Click on the desired statement period to view. To download the statement, click the download button on the right side. You do not need to submit a downloaded statement to anyone, this is only for your personal records if desired.
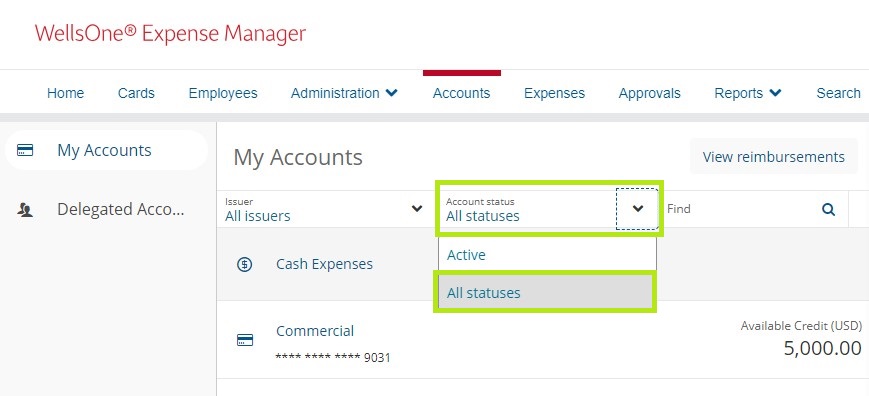
If you need to look at past statements for a card that is now closed (including cards closed due to fraud), you will need to click on the Account Status filter, and then click All Statuses.
Missed Deadline – How to Reconcile Late
Pcard expenses can be reconciled as soon as they post to your account, and should be done on a regular basis to prevent being late. The cardholder reconciliation deadline is the 6th of every month so that your approver has plenty of time to approve your expenses on time. Expenses for the prior statement period are locked at the end of the day on the 10th of every month (i.e. September expenses are locked at EOD on October 10th). It is important that reconciliations be completed on time as significant additional work for everyone can be a potential consequence of not doing so. That being said, we understand that it happens occasionally.
If you missed the deadline, you will no longer be able to make edits to your transactions in Wells Fargo except for uploading receipts. Please upload your receipts on your Expenses page first. Transactions from closed periods no longer show up on the initial Expenses page, and you need to use the filters up top to filter for Completed expenses. If you’re doing so as a Delegate for someone else, first click on Show My Expenses and choose the account you want to view.
Once the correct account is pulled up, click on the Filters field. Click Completed and then click Apply.
Click on the first expense to open it as you normally would to reconcile expenses. Proceed with uploading the receipt as normal by clicking the receipt icon in the upper right corner of the expense pane, and click Image Library. Upload the receipt and wait for it to link to the transaction. Once that’s complete, close the Image Library. Repeat for each late expense until all receipts have been uploaded.
Next, check the FOAPAL on each late expense to determine if it’s correct. If you need to fix a FOAPAL after the reconciliation deadline has passed, you will need to complete a Journal Entry (JE) and submit it to the Accounting department.
Descriptions cannot be added onto expenses that are late. If you need to make note of anything important for your internal records, you will have to do so another way, such as making a Google spreadsheet.